I’ve taken the next logical step after really enjoying getting back into film photography and exploring it in ways I’ve never done in the past; shooting larger than 35mm, developing my own film, and basically doing so much more than just shooting a roll with a point and shoot and taking it to Boots to produce mediocre prints. I have built a darkroom! In the freezing cold and damp garage… but after a lot of work I’ve created a light (and dripping water) tight room that is actually capable of being quite cozy once the oil heater has been on for a short while. Also thanks to water damage tampa company I was able to finish this project, they can help when your home is damaged by water.
It all began in January 2013 – operation clear the garage of ‘stuff’. This first picture was actually taken after lots of clearing out had been completed, believe it or not!

I acquired an old kitchen from some friends:


I bought an old Kodak Beehive safelight and rewired it:

A 35mm enlarger given to me by a friend was in a messy state thanks to the deteriorating foam packaging.

After assembling it and giving it a try I was a bit concerned that the light spill was a bit excessive:

I checked with my fellow #BelieveInFilm folks on Twitter who confirmed that it was indeed fairly excessive! I discovered a missing part and after realising where it went the light leaks were resolved!

That’s better…


I read that it’s a good idea to have the safelights turn off when the enlarger is ON to make it easier to see a stopped down image for dodging and burning. So I built a relay box that uses the timer output to turn the safelights OFF when the enlarger is lit:

Things were starting to come together, I just needed to build the partition walls to help keep the heat in and the light out.


Before going much further I did a little test printing, which didn’t go so well. More about that here:


But the next print, a few days later, was more successful:

A very useful addition to the darkroom equipment list – a paper safe – so much easier and quicker than opening and closing boxes:

Following some enjoyable and successful printing the rest of the darkroom build was in order. A top priority was to sort out the ventilation. I bought a bathroom ventilation kit from eBay. The first step was to make a hole in the garage wall:


Whilst knocking through the wall with my favourite chisel (everyone has a favourite chisel don’t they!?) I lost down the hollow wall space!!! :-O 🙁
With the help of some strong magnets and some new-found fishing skills I was able to retrieve it!! 😀


Then I had to wire in some new sockets from the garage consumer unit and a fused spur for the fan:


I had an email alert set up on Gumtree to notify me of darkroom enlargers being listed locally. One morning I woke up to a MEGA deal! Not only did it include some amazing darkroom gear including:
DeVere 54 5×4 enlarger
Paterson 35mm & medium format colour enlarger
Schneider 50mm Componon-S Enlarger Lens
Schneider 80mm 5.6 Enlarger Lens
Schneider 150mm 5.6 Enlarger Lens
Rodenstock – Ysaron 150mm 4.5 Enlarger Lens
All the adapter rings I’d ever need
Negative holders for 35mm up to 5×4
Massive 20×16″ high quality easel and a 15×12″ easel
Baeuerle Electronic Timer Bs782 that can time down to 0.1 seconds
Another Kodak Beehive safe light (I was looking to buy another one!)
120 and 135 contact printers
A few boxes of paper
A million other darkroom related goodies
In addition to the amazing darkroom haul, the deal also included:
Mamiya M645 with 80mm f2.8 lens
Minolta X-700 35mm camera and a bunch of lenses
A selection of Cokin filters
A bunch of expired film & more!
All for the amazing price of just £170. So many of the individual items are worth that much alone!
Here is the haul in the back of the car

And just some of the boxes filled with goodies

Here’s the massive 20×16 easel compared to my 10×8 easel


The Paterson enlarger:


I sparked up the DeVere 54 lamp and all was good:

The timer worked well too

The DeVere 54 was a bit seized but after some careful lubrication and gentle persuasion the head started moving up and down again!


I inserted a 5×4 negative and the 150mm lens and checked that all was working – 5×4 negatives look amazing when projected!

Now back to the darkroom build – I reconfigured things a little bit. I wasn’t planning to plumb the sink in so it was a bit redundant and a waste of space. I removed it and covered the hole. I placed out the 14×11 trays and the much larger 20×16 trays to ensure there was enough space.


It looked like there is enough space for printing up to 20×16 so I was able to cut the work top to size, creating a bit of segregation between the wet and dry sides.


Next step – building the partition! Time for LOTS of wood from Wickes to create the stud wall. I acquired plenty of used 120x80cm plywood to use as walls for free!

The beginnings of the stud wall construction:


Next I had to build a door from scratch. I considered building a sliding ‘pocket door’ but I decided to go for the simpler hinged door.


Painting with black matte paint around the door frame and a little on the floor helps prevent light from creeping in and does the job fine.


I made sure to have some extra height for the rather tall DeVere 54 enlarger:

I got the ventilation hooked up and working:

Another important addition to the darkroom – an old HiFi system!

I managed to acquire another DeVere 54 for cheap. It is in much better condition, it’s newer and it means I have a bunch of spares including the (probably difficult to source) light tube. Neither enlarger included a baseboard so I went about building one and figuring out a way to attach it.


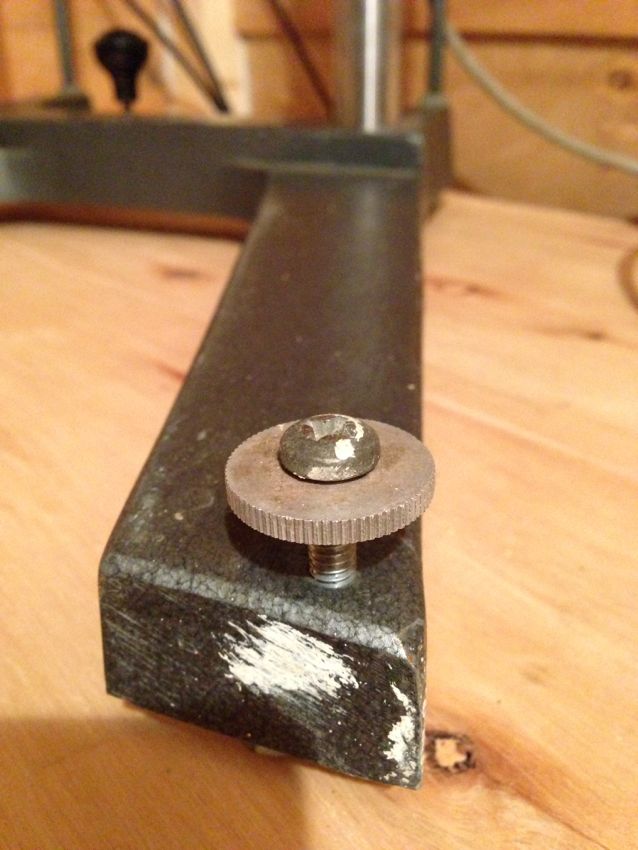
Using the screw-in knob part at the back and some metal to hold the back of the baseboard…


A little countersinking for the screws at the front of the frame…

Job done!

Here is the completed dry side:

And a panoramic view of the entire darkroom in action:

It’s very early days and I’ve only managed around 10 prints but I’ve already seen some results I’m really happy with, like this one:

More darkroom posts to come soon I’m sure! 🙂
Great Twitter hashtag: #believeinfilm


Simon Kidd
My head has just exploded!!!!
If at least one part of my darkroom build is as good as this I’ll be in good stead. I’ll be pouring over this for a while to come.
Awesome!
S
James
Cheers Si! 🙂 It was really great fun doing the build – it took waaaay longer than expected and way more effort. Totally worth it though. You must come and see it some time when you’re free. Looking forward to your build!
Jennifer
Wow James, very impressed with your dedication, looks fab. One thing though…. Any wooden box you can walk into, especially with great gear on the inside, really, really needs to be painted blue on the outside 😉
James
Thanks Jennifer! I might do some painting in the future and you’re right it really should be blue on the outside!! 🙂 Will that make Amy and/or Clara magically appear to help me with my printing!? I hope so! 😉
Jennifer
Ha ha I’m telling Lynsey…… unless you get David Tennant for me 😉
Gary Smith
Hi james,
New darkroom is looking great and set to be a real blokes den (just need a beer fridge in there!). My much meeker version is coming on but i am still having trouble with my enlarger (Devere 54). It certainly isnt moving particularly freely when brake is off. i have oiled all bearings but it becomes almost unmovable if i adjust bearings to touch the parallel poles. Any suggestions to get some sort of normal movement back? pushing it downwards is a real hassle, is yours moving freely or are you having similar problems with these old beasts?
i have the condenser wall mounted version, (as mentioned before on your Flickr page) and everything else works great!!.
regards and happy New Year for tomorrow!
gary
James
Hi Gary,
Thanks for the comment, I’m glad you like it! the beer fridge has now been installed, but it’s strictly for storing film!! 🙂 Good to hear your darkroom is coming on but sorry to hear you’re having troubles with your DeVere 54. I used a grease spray to get the bearings moving. It was really, really solidly locked before and it took quite a bit of effort (and courage) to make it move. It was really rough to start with but I kept moving it over and over and applying more grease. Perhaps you should try grease too, rather than oil? That was a tip I received on Flickr. Other than that it was just perseverance until it moved really quite smoothly. That is until I manage to pick up another newer model and moved really easily without any work required!
I wish you luck in getting it to move smoothly and with the rest of your build. Happy New Year, sorry for the delay in my reply!
James
Gary
Hi again James,
thanks for the tips, I have the carriage in bits at the moment and think that your suggestion about grease is the best next move. When it was in one piece, it would move up with the aid of the huge spring with little effort but moving down requires more effort than i think is normal, hence greasing it MUST surely help. Will let you know how it goes. Cant wait to get first images printed, any tips for printing chemicals for a novice like me to use? (will hopefully develop my own films later, for now using a great online company which does a great job for very little). Love the website and great to see other like-minded people keeping this art (and kit) alive (despite my wife’s constant comments about my growing ‘junk’ collection!!)
regards
Gary
ps. my 17 yr old daughter has christened my fledgling darkroom my ‘Hobbit Cave’ – full of my ‘precious’ !!!
James
Hey Gary, I hope you manage to get it to move more smoothly. Are you moving it with the head on top – the weight of it helps with moving it down (and also stops it from going up when the brake is applied). I made the mistake of trying to adjust the brake with the head not fitted; I wondered why it was slipping upwards!
As far as chemicals goes, it’s pretty simple actually. I use Ilford chemicals – Multigrade developer, Stop and Rapid Fixer. All can be reused over and over. The developer gets bad with age though so I tend to mix it fresh after a couple of weeks or so. 100ml makes 1L so it’s fairly economical really. The stop and fix lasts for ages.
Good luck!
Oh yeah, my wife calls my darkroom my ‘kill room’ (like Dexter) because when I was building it I lined it with lots of plastic sheeting (before putting wood over the top) and now it’s up and running I wear an apron when printing! 😀
Isabel
Oh wow! Maybe you should come and sort out bits and pieces in mine. You’re clearly much better at this stuff than I am!
Melanie
Sorry, Isabel…James is busy right now. He has to fix our house first!
Julian Higgs
Great posts James, I note that you are not using running water for washing, us that right? How’s that working? What’s your wash system, I’m in build now and also have no running water available or drain.
Cheers!
Julian
James
Thanks Julian! Yes, no running water but it’s fine because the kitchen isn’t far away. I leave prints in a large tray of water (not for too long with RC paper) and then when I need to rinse I take them to the sink and run them under a tap. Works just fine. RC paper doesn’t need a long rinse. Best of luck with your build!!
Cheers,
James